Sunday, January 15, 2012

Catching up on Christmas...

I know it's mid-January already, but I figured better late than never... so, here are some of the Pinterest hits and misses from Christmas in list form:

1. DIY Coffee Sleeves...

Here is the idea from Pinterest for these. They looked like a really fun and personalized gift idea...


I made these for my sister and for a dear friend in Boston who are both slightly addicted to Starbucks (no offense Mel and Amanda...) and they both loved them!

First, hit up the local Wally World or department store and find some fun and festive socks.

Then pick out some cute buttons, ribbons, and pom-poms, etc. Pretty much anything you can sew on to the socks will work.

All you have to do then is cut about a 6 inch section off the leg part of the sock and then sew on the decor. The edges will automatically curl down so you don't have to worry about them fraying and you don't have to hem them.

Here are some of the ones I made my sister...voila!!


So.... here's the comparison:


2. Jingle bell Shadow Box...

The original....


I have to just say that this has been my favorite (and the easiest!) project that I have tried so far. I gave them as Christmas gifts to several people and everyone loved them!

All you have to do is cover the back of the shadowbox with festive scrapbook paper, add various sizes of jingle bells to the inside of the shadowbox and then adhere the lettering to the outside. The letters can be ordered from stampin' up. I like the black letters better, but they don't carry them anymore... Just the red.

Here's my attempt...


And the comparison...


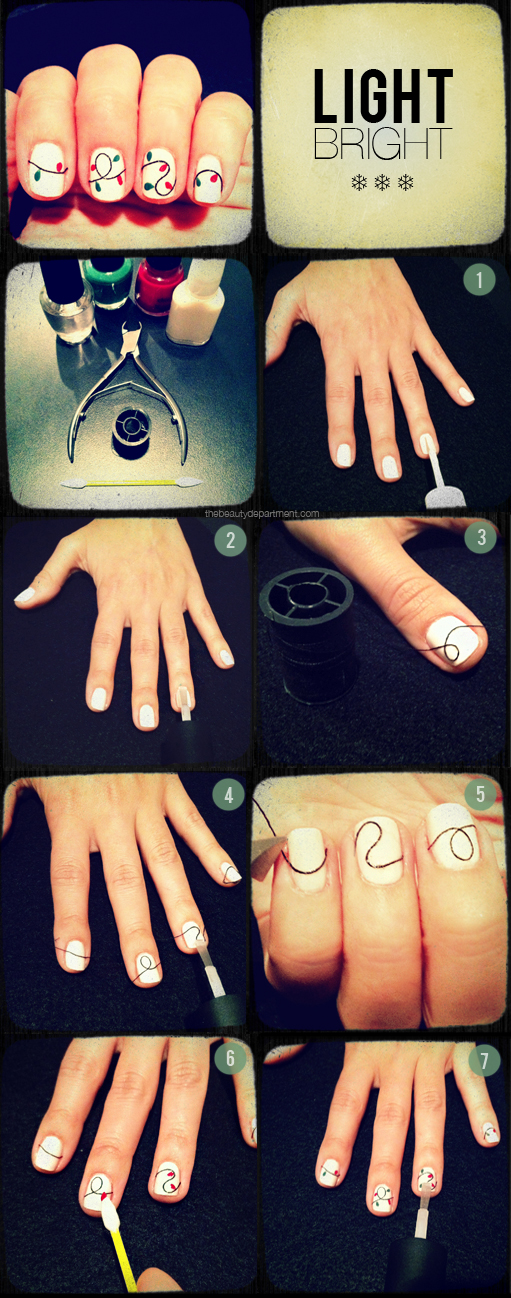
3. Christmas Light Fingernails...

When I saw this little gem on Pinterest, I was really excited to try it so I enlisted the help of my sister since I am absolutely horrible at painting my own nails. This one will definitely need some additional practice next year. The strings don't really stick in unless you put several coats on and then they tend to chip from so many coats. Definitely some adjustments to come on this one.

The process is pretty self-explanatory... you put a white coat on your nails, twist little loops of string onto your nails while they are wet and then clear coat over them once they dry. Then, all that is left is to paint the "lights" on over that.


Pinterest...


Me... (Sorry, the picture is not that great. I was still waiting on the final coat to dry and then had to go back with polish remover and clean up the edges.)


That's all for now... Next up: We'll give a couple of recipes a try.


Saturday, January 7, 2012

New Year... New Journal...

So, I have always been horrible about keeping a journal/diary, but this new year I decided that I would start anew and really try to do better about keeping up with the day-to-day things that happen in my pretty average and rather boring oh so incredibly exciting life! Of course, I found a really cute and easy daily journal idea on Pinterest and thought I'd give it a try...


 This is the journal I found on Pinterest...


The idea is that you take index cards and label one for each day of the year. Then, for each day, you write the year and something that happened to you that day on that year. I love this idea because it is quick and lasts for years and years! The Pinterest journal recommended using a fruit contanier as the box and vintage postcards as the month dividers, but I couldn't find either of those things anywhere (and, it's not really my style anyway...), so I decided to modify it just a smidge and make it a little more colorful and fun!


So... Here we go.... 


Supplies:

1. Index Cards

2. Cute Box or Basket
(I found a great gift box on sale and just threw away the lid)

3. Markers

4. Stickers
(Or, whatever else you want to use to decorate with)


First thing... Decorate your box or basket as you like. Put stickers on it, draw on it, there really are no rules.


Then, label all of the cards.


I used one whole index card for each day and labeled them in the top right corner (the original said to cut them in half, but I can get a little wordy as you will soon see so I didn't cut them). Then, I took one card to for each month and stood it vertically between the daily cards to separate them. All you have to do now is put all of the cards in order in the box and you're done!


The finished product...


This was really super easy to make and only took about half an hour to complete from start to finish. The longest part was writing out the date for each card.

As of now, 1/7, this is by far the most successful journal I have ever endeavored to keep! I haven't missed a day and it is really easy to remember. Just make sure you put it in a place that you see every day.


Thursday, December 29, 2011

Helloooo Blog World!

So... I am new to this blogging thing, but I am really excited to combine blogging with my other new-found love: Pinterest! I love all of the super crafty and money-saving ideas over there and am going to use this blog to keep track of my DIY sucesses and miserable, utter failures inspired by those addicting little pins...

I can be found at: http://pinterest.com/bethanywhite/. Follow, follow, follow... :)